[ iOS/UIkit ] UITableView로 마이페이지 구현하기

안녕하세요! 개발감자입니다.
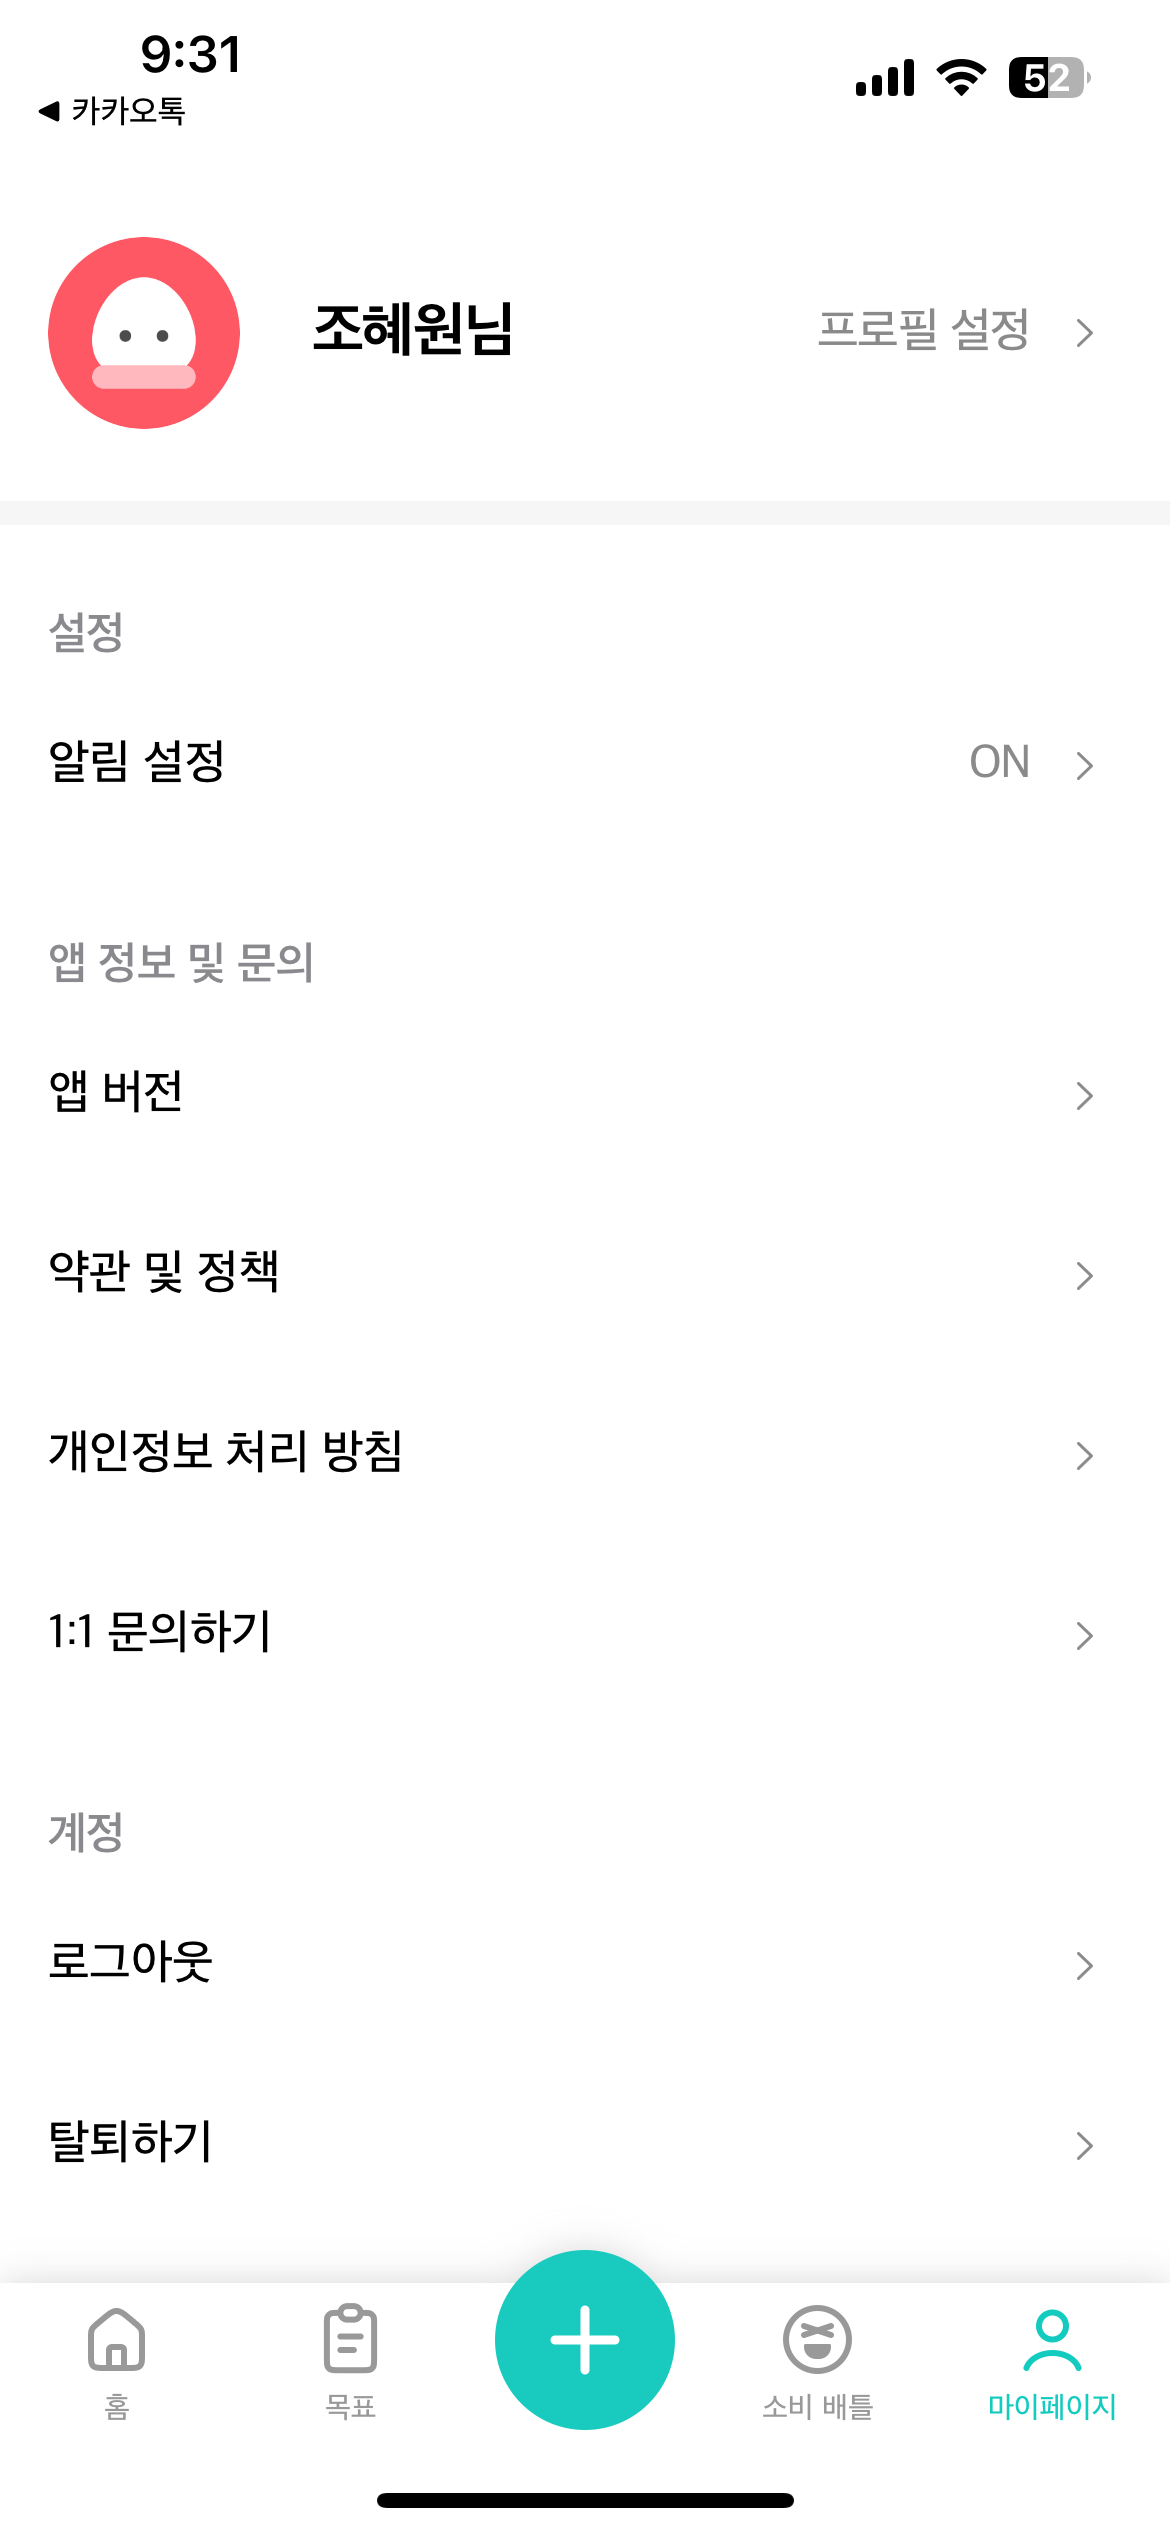
오늘은 iOS 앱 개발에서 자주 사용되는 UI 구성 요소 중 하나인 테이블뷰를 이용해 마이페이지를 구현하는 방법에 대해 알아보려고 합니다. 이 글에서는 UIKit의 UITableView를 사용하여 마이페이지의 다양한 섹션과 옵션을 표시하는 방법을 함께 살펴보겠습니다. 시작하기에 앞서 오늘 설명할 코드의 결과물을 먼저 보여드리고 시작할게요!
이 결과물을 어떻게 만들었는지 코드를 보면서 설명해보도록 하겠습니다.
목차는 아래와 같습니다.
1. MyPageViewController.swift
1) 기본 설정 및 초기화
2) UITableViewDataSource 구현
3) UITableViewDelegate 구현
2. MyPageTableViewCell.swift
1) 셀 구성요소
2) 프로필 정보 추가
1. MyPageViewController.swift
1. MyPageViewController.swift
MyPageViewController는 마이페이지의 주요 화면을 관리하는 뷰 컨트롤러입니다. 이 클래스는 UITableViewDataSource, UITableViewDelegate, 그리고 커스텀 프로토콜인 ProfileViewDelegate를 채택하여 구현됩니다.
//  MyPageViewController.swift
//  Money-Planner
//
//  Created by p_kxn_g on 1/30/24.
//
import Foundation
import UIKit


class MyPageViewController: UIViewController, UITableViewDataSource, UITableViewDelegate, ProfileViewDelegate {
    var tempUserName : String = ""
    var tempProfileImage: UIImage?

    var user = User()
    // 테이블 뷰 데이터 소스
    let myPageData = [
        Section(title: "프로필", items: ["프로필"]),
        Section(title: "설정", items: ["알림 설정"]),
        Section(title: "앱 정보 및 문의", items: ["앱 버전", "약관 및 정책", "개인정보 처리 방침", "1:1 문의하기"]),
        Section(title: "계정", items: ["로그아웃", "탈퇴하기"])
    ]

    // UITableView 인스턴스
    let tableView: UITableView = {
        let table = UITableView()
        table.translatesAutoresizingMaskIntoConstraints = false
        table.separatorStyle = .none
        return table
    }()

    override func viewDidLoad() {
        super.viewDidLoad()
        tempUserName = user.userNameString
        navigationController?.isNavigationBarHidden = true // 네비게이션 바 숨김

        // 커스텀 UITableViewCell 등록
        tableView.register(MyPageTableViewCell.self, forCellReuseIdentifier: "myPageCell")


        // 테이블 뷰의 델리게이트와 데이터 소스 설정
        tableView.delegate = self
        tableView.dataSource = self

        // 테이블 뷰를 뷰 계층에 추가
        view.addSubview(tableView)

        // 테이블 뷰에 대한 제약 조건 설정
        NSLayoutConstraint.activate([
            tableView.topAnchor.constraint(equalTo: view.topAnchor),
            tableView.leadingAnchor.constraint(equalTo: view.leadingAnchor),
            tableView.trailingAnchor.constraint(equalTo: view.trailingAnchor),
            tableView.bottomAnchor.constraint(equalTo: view.bottomAnchor)
        ])
    }

    // MARK: - UITableViewDataSource 메서드

    func numberOfSections(in tableView: UITableView) -> Int {
        return myPageData.count
    }

    func tableView(_ tableView: UITableView, numberOfRowsInSection section: Int) -> Int {
        return myPageData[section].items.count
    }

    func tableView(_ tableView: UITableView, cellForRowAt indexPath: IndexPath) -> UITableViewCell {
        let cell = tableView.dequeueReusableCell(withIdentifier: "myPageCell", for: indexPath) as! MyPageTableViewCell
        let item = myPageData[indexPath.section].items[indexPath.row]
        var text = item

        if item == "알림 설정" {
            // 알림 설정인 경우 on or off 버튼 추가
            text = "ON"
            cell.optionalLabel.text = text

        }
        if item == "프로필"{
            text = "프로필 설정"
            cell.optionalLabel.text = text
            tempProfileImage = UIImage(named: "add-05")
            cell.addProfile(user.userNameString, image : tempProfileImage)

            // 프로필인 경우 프로필 띄우기
        }
        else{
            cell.textLabel?.text = item
            cell.textLabel?.font = UIFont.mpFont16M()

        }

            // 각 셀에 대한 추가 작업을 수행할 수 있습니다.
            return cell
        }

    func tableView(_ tableView: UITableView, titleForHeaderInSection section: Int) -> String? {
        if myPageData[section].title == "프로필"{
            return nil // 부제목을 표시하지 않음
        }
        return myPageData[section].title
    }
    func tableView(_ tableView: UITableView, heightForRowAt indexPath: IndexPath) -> CGFloat {
        let item = myPageData[indexPath.section].items[indexPath.row]
        if item == "프로필"{
            return 128.0 // 프로필인 경우 높이 120

        }else{
            return 60.0 //프로필이 아닌 경우 높이 60
        }

    }

    // MARK: - UITableViewDelegate 메서드

    func tableView(_ tableView: UITableView, didSelectRowAt indexPath: IndexPath) {
        tableView.deselectRow(at: indexPath, animated: true)

        // 셀 선택 처리
        let selectedItem = myPageData[indexPath.section].items[indexPath.row]

        switch selectedItem {
        case "프로필":
            // 프로필 뷰로 이동
            print("프로필 선택됨")
            // 프로필 설정 화면으로 이동
            settingProfile()

        case "알림 설정":
            // 알림 설정 뷰로 이동
            print("알림 설정 선택됨")
        case "앱 버전":
            // 앱 버전 뷰로 이동
            print("앱 버전 선택됨")
        case "약관 및 정책":
            // 약관 및 정책 뷰로 이동
            print("약관 및 정책 선택됨")
        case "개인정보 처리 방침":
            // 개인정보 처리 방침 뷰로 이동
            print("개인정보 처리 방침 선택됨")
        case "1:1 문의하기":
            // 1:1 문의하기 뷰로 이동
            Ask()
            print("1:1 문의하기 선택됨")
        case "로그아웃":
            // 로그아웃 처리
            print("로그아웃 선택됨")
            // 로그아웃 모달로 이동
            let logoutVC = PopupViewController() // 로그아웃 완료 팝업 띄우기
            present(logoutVC, animated: true)


        case "탈퇴하기":
            // 계정 탈퇴 처리
            print("탈퇴하기 선택됨")
            Unregister()
        default:
            break
        }
    }

    // 섹션과 아이템을 나타내는 데이터 구조
    struct Section {
        var title: String
        var items: [String]
    }

    func profileNameChanged(_ userName: String, _ profileImage : UIImage?) {
        user.changeUserName(userName)
        tempUserName = userName
        tempProfileImage = profileImage // Set the profile image in your User model

        // Reload only the cell representing the profile
        if let indexPath = indexPathForProfileCell() {
            tableView.reloadRows(at: [indexPath], with: .none)
        }

        print("프로필 이름이 변경되었습니다")
        print(user.userNameString)
        view.layoutIfNeeded()
    }

    private func indexPathForProfileCell() -> IndexPath? {
        for (sectionIndex, section) in myPageData.enumerated() {
            if let rowIndex = section.items.firstIndex(of: "프로필") {
                return IndexPath(row: rowIndex, section: sectionIndex)
            }
        }
        return nil
    }

    func settingProfile() {
        let profileVC = ProfileViewController(tempUserName: tempUserName) // 프로필 설정 화면으로 이동
        profileVC.modalPresentationStyle = .fullScreen
        profileVC.delegate = self
        present(profileVC, animated: true)
    }
    func Ask(){
        let askVC = AskViewController() // 프로필 설정 화면으로 이동
        askVC.modalPresentationStyle = .fullScreen
        //askVC.delegate = self
        present(askVC, animated: true)

    }
    func Unregister(){
        let unregisterVC = UnregisterViewController() // 프로필 설정 화면으로 이동
        unregisterVC.modalPresentationStyle = .fullScreen
        //askVC.delegate = self
        present(unregisterVC, animated: true)

    }
}
1) 기본 설정 및 초기화
- 사용자 정보와 마이페이지 데이터를 저장하기 위한 변수들이 선언되어 있습니다.
- UITableView 인스턴스를 생성하고, 기본적인 스타일을 설정합니다. 테이블 뷰의 셀로는 MyPageTableViewCell이 사용됩니다.
- viewDidLoad 메서드에서 테이블 뷰를 뷰 계층에 추가하고, 적절한 제약 조건을 설정하여 화면에 표시될 수 있도록 합니다.
2) UITableViewDataSource 구현
- 섹션의 개수(numberOfSections)와 각 섹션의 행 수(numberOfRowsInSection)를 결정하기 위해 myPageData 배열을 참조합니다.
- 각 셀의 내용은 tableView(_:cellForRowAt:) 메서드에서 구성됩니다. 여기서는 특정 아이템(예: "프로필", "알림 설정")에 따라 다른 UI 구성 요소를 셀에 추가하거나 변경합니다.
3) UITableViewDelegate 구현
- 셀의 높이(heightForRowAt)는 "프로필" 아이템과 다른 아이템을 구분하여 다르게 설정합니다.
- 사용자가 셀을 선택했을 때(didSelectRowAt)의 동작을 정의합니다. 예를 들어, "프로필"을 선택하면 프로필 설정 화면으로 이동합니다.
2.MyPageTableViewCell.swift
MyPageTableViewCell 클래스는 마이페이지의 각 항목을 나타내는 데 사용되는 커스텀 테이블 뷰 셀입니다.
//
//  cell.swift
//  Money-Planner
//
//  Created by p_kxn_g on 1/30/24.
//

import Foundation
import UIKit
class MyPageTableViewCell: UITableViewCell {
    let container : UIView = {
        let view = UIView()
        //view.backgroundColor = .red
        return view
    }()
    // 셀에 추가할 이미지 뷰
    let cellImageView: UIImageView = {
        let imageView = UIImageView()
        imageView.contentMode = .scaleAspectFit
        imageView.image = UIImage(systemName:"chevron.forward")
        imageView.tintColor = .mpDarkGray

        imageView.translatesAutoresizingMaskIntoConstraints = false
        return imageView
    }()
    let optionalLabel : MPLabel = {
        let label = MPLabel()
        label.font = UIFont.mpFont16M()
        label.textColor = .mpDarkGray
        label.text = ""
        return label
    }()

    let userName : MPLabel = {
        let label = MPLabel()
        label.font = UIFont.mpFont20B()
        label.textColor = .mpBlack
        return label
    }()
    let userImage : UIImageView = {
        let imageView = UIImageView()
        imageView.backgroundColor = .mpGypsumGray
        imageView.layer.cornerRadius = 32 //지름 64
        imageView.layer.masksToBounds = true
        imageView.contentMode = .scaleAspectFill
        //imageView.image = UIImage(systemName: "pencil")
        imageView.translatesAutoresizingMaskIntoConstraints = false
        return imageView
        }()
    override init(style: UITableViewCell.CellStyle, reuseIdentifier: String?) {
        super.init(style: style, reuseIdentifier: reuseIdentifier)

        // 셀에 이미지 뷰를 추가
        addSubview(container)
        container.addSubview(cellImageView)
        container.addSubview(optionalLabel)
        container.translatesAutoresizingMaskIntoConstraints = false
        cellImageView.translatesAutoresizingMaskIntoConstraints = false
        optionalLabel.translatesAutoresizingMaskIntoConstraints = false

        //addSubview(alarmSettingLabel)
        // 이미지 뷰에 대한 제약 조건 설정
        NSLayoutConstraint.activate([
            container.topAnchor.constraint(equalTo: topAnchor),
            container.trailingAnchor.constraint(equalTo: trailingAnchor,constant:-25),
            container.bottomAnchor.constraint(equalTo: bottomAnchor),
            container.widthAnchor.constraint(equalToConstant: 89),
            cellImageView.topAnchor.constraint(equalTo: container.topAnchor),
            cellImageView.trailingAnchor.constraint(equalTo: container.trailingAnchor),
            cellImageView.bottomAnchor.constraint(equalTo: container.bottomAnchor),
            cellImageView.widthAnchor.constraint(equalToConstant: 8),// 이미지 뷰의 폭 조정
            optionalLabel.topAnchor.constraint(equalTo: container.topAnchor),
            optionalLabel.trailingAnchor.constraint(equalTo: cellImageView.leadingAnchor, constant: -13),
            optionalLabel.bottomAnchor.constraint(equalTo: container.bottomAnchor),
            //alarmSettingLabel.heightAnchor.constraint(equalToConstant: 22),
            //larmSettingLabel.trailingAnchor.constraint(equalTo: cellImageView.leadingAnchor,constant:13),
            //alarmSettingLabel.widthAnchor.constraint(equalToConstant: 24) // 이미지 뷰의 폭 조정

        ])
    }
    func addProfile (_ name : String, image : UIImage?){
        let blank : UIView = {
            let view = UIView()
            view.backgroundColor = .mpGypsumGray
            return view
        }()
        userName.text = "\(name)님"
        userImage.image = image

        container.addSubview(userImage)
        container.addSubview(userName)
        container.addSubview(blank)

        userImage.translatesAutoresizingMaskIntoConstraints = false
        userName.translatesAutoresizingMaskIntoConstraints = false
        blank.translatesAutoresizingMaskIntoConstraints = false


        NSLayoutConstraint.activate([
            userImage.centerYAnchor.constraint(equalTo: centerYAnchor),
            userImage.leadingAnchor.constraint(equalTo: leadingAnchor,constant:16),
            userImage.widthAnchor.constraint(equalToConstant: 64),
            userImage.heightAnchor.constraint(equalToConstant: 64),
        // 유저 네임에 해당하는 라벨 오른쪽으로 옮기기
            userName.centerYAnchor.constraint(equalTo: centerYAnchor),
            userName.leadingAnchor.constraint(equalTo:userImage.trailingAnchor,constant:24),
            blank.leadingAnchor.constraint(equalTo: leadingAnchor),
            blank.trailingAnchor.constraint(equalTo: trailingAnchor),
            blank.heightAnchor.constraint(equalToConstant: 8),
            blank.bottomAnchor.constraint(equalTo: bottomAnchor),

        ])

    }
    func setUserName(_ name: String) { // 사용자 이름 업데이트
           userName.text = "\(name)님"
       }
    required init?(coder: NSCoder) {
        fatalError("init(coder:) has not been implemented")
    }
}
1) 셀 구성요소
- 셀에는 사용자 프로필 이미지, 이름 라벨, 선택적 라벨, 이미지 뷰 등 여러 UI 컴포넌트가 포함됩니다.
- 각 컴포넌트는 Auto Layout 제약 조건을 사용하여 적절한 위치와 크기를 가지도록 설정됩니다.
2) 프로필 정보 추가
- addProfile 메서드를 통해 셀에 프로필 이미지와 사용자 이름을 추가하고 배치합니다. 이는 "프로필" 아이템에 대한 셀 구성에 사용됩니다.
이렇게 MyPageViewController와 MyPageTableViewCell를 통해 마이페이지의 UI를 구성하고, 각 섹션과 아이템에 대한 상호작용을 정의할 수 있습니다. UIKit의 UITableView를 사용하면 다양한 설정과 정보를 표시하는 마이페이지를 효과적으로 구현할 수 있습니다. 이 구현 방법은 iOS 앱 개발에서 자주 사용되는 패턴 중 하나이며, 커스터마이징하여 다양한 요구 사항에 맞게 조정할 수 있습니다.